Home Network Renovations
VLANs for Everybody! - 14/10/26#
So a few months ago I made the decision to purchase a new router and do some proper network administration around my house. I did some researching and after considerations around my weigh-ups between form and function, decided to go with a Ubiquiti UniFi Dream Router 7, as it gave a beginner-friendly “single pane of glass” for all the configurations I was looking to implement on my home network through the UniFi app suite. Now, I am not advertising for them or promoting them in any capacity, and there are most likely more convenient or functional alternatives that exist; this was just the option that I felt worked best for me personally from the reading/video watching that I had done. It got delivered shortly after I ordered, and due to other factors going on, I didn’t really do a massive amount with it when I initially installed it. I made a couple of VLANs without putting too much thought into them, with the intention of putting more thought and effort into it at a later date.
As the next 8 weeks or so went by, I got distracted by trying to build what was essentially a pwnagotchi using KTOX_Pi and a 2nd Raspberry Pi that I had which wasn’t getting used, as a toy to play about with on my home network. This is a separate writeup entirely, and so I won’t get into too much detail around it, but working on it made me realise that having a nicer network to test the functionality of the device would probably be worthwhile. So at this point, I started to think more around what an ideal network diagram would look like and what options I needed to consider as I start to add more devices and self-hosted services at home. At the same time, I was learning more about what everyone is already acutely aware of in the privacy concerns around smart TVs and other IoT devices sitting on home networks. There were quite a few videos that I watched specifically around the LG Smart TVs and their lack of concern for invading the privacy of home networks. I mean, if you haven’t read or watched anything around this, then I’d recommend you do, as the actuality of the situation is almost more unnerving than what you initially expect it to be. So I finally decided that it was probably worth making some meaningful configuration changes to my home network.
The first thing I wanted to do was to make an actual plan around what I wanted the end product of the network to look like. To me, this meant separating my trusted devices from any untrusted IoT devices, having a soft-play area for any lab work I want to do with hacking tools, and then a VLAN for any services that are hosted to air gap these from my devices. So with this plan in mind, I created 4 VLANs: VLAN 10 (Trusted_LAN), VLAN 20 (IOT_UNTRUSTED), VLAN 30 (SEC_LAB), and VLAN 40 (Services_DMZ).
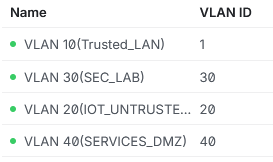 For each of these, I assigned a corresponding subnet with a /24 mask so that they had more than enough space. With the VLANs created, I made the decision to give each VLAN a distinct SSID, meaning I could name my services VLAN as “Services-Home” (not what it’s actually called, as I let my fiancée pick the names and she picked something that is a little interesting to put it nicely). Each of the SSIDs were then configured so that they assigned to the corresponding VLAN and appropriate bands set for each. I connected my phone to each as a test to make sure that DHCP was assigning the expected IP to the phone depending on what I was connected to. The majority of my devices at home are currently connecting over Wi-Fi, so I didn’t need to do anything extra fancy with the port management or any added switches; all I did was assign the one device I do have wired, my PC, to the correct VLAN on the port it is plugged into.
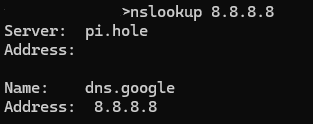
Once all of these were attached at the hip, I went around the house connecting devices to their specific VLAN and double-checked they all were provided an expected IP and none of them were having any further connection issues. The only thing that had to be changed at this point was that I had to include the 5GHz band for my IoT VLAN, as it wasn’t initially included and my TV refused to connect with just 2.4 GHz, but that was a painless fix. Now, for a little while at home, I was making use of Pi-hole, a very well-known network-level ad and tracker blocking application which “acts as a DNS sinkhole”, essentially preventing traffic of these categories from resolving. I had some trouble with it on my previous router as it kept disconnecting, meaning the rest of my devices would not connect properly, and so it had kind of just been gathering dust on a shelf with some of my other forgotten techy bits for a while. This network “revamp” seemed like the ideal time to give it a second chance, and so I had planned for it to be the very first device that I installed onto the services VLAN. Once connected, I made sure to assign it a static IP so that should anything dodgy happen in the future it would require one less thing to consider. As it was going to be accepting DNS requests from subnets across the router rather than just the local link (same subnet), I made sure to enable the “Permit all origins” setting within the admin dashboard. With this set up, I just needed to edit each of the required subnets to set their DNS server manually to the static IP assigned to the Raspberry Pi that was running Pi-hole in the services VLAN. Again, I tested this on my PC to make sure that the resolved addresses were provided from the Pi-hole IP.
The final step that I wanted to do was to make sure that I had some very simple firewall rules in place across the network to make sure that the VLANs were only talking to each other where explicitly required, to make sure the segmented setup actually had a purpose. UniFi uses what are called LAN In rule types for inter-VLAN controls, sort of meaning rules that are set up within my home network that specify where devices connected to certain VLANs can speak to and where they can’t. To go along with the whole last paragraph, the first rule that was specified explicitly was to allow DNS traffic to reach Pi-hole. This meant setting the action to “Accept” connections for both TCP and UDP protocols from any source in the other VLANs to the destination IP of the Raspberry Pi using port 53. Other rules were made for only allowing established and related connections and blocking the IoT, Lab, and service VLANs from speaking to the trusted devices. All of these rules again were tested by connecting to each SSID on another device and seeing if they could ping my PC, all of which timed out, whereas my PC could ping the other device every time.
The aim of this little home project was to provide a little more defence in depth for my home network. I’ve segmented my trusted devices from others on the network that are more likely to be compromised without me being instantly aware, allowing a little more breathing room should anything go horribly wrong. I’ve also laid the foundations for my network so that as I get more self-hosted solutions implemented, I’ll have already covered some of the required work when it comes to the network so that they can be appropriately managed and restricted where required. I hope this very brief walkthrough was somewhat interesting; I find that things look a lot more boring on paper than actually working on them, so if you have the means to do so, then I’d highly recommend doing some network administration at home as this is barely the tip of the iceberg and there are a lot more interesting things that can be done. I’ll hopefully have more posts around the work that I’m going to keep doing on this topic in the future as I already have a few plans, so if you have any interest at all then keep an eye out or subscribe to the RSS feed of my site.
Cheers, Jack :)